Step-By-Step Instructions
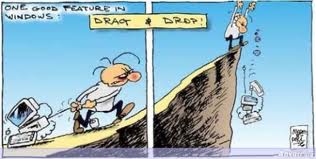
Drag and Drop Shopping Cart
Printer Friendly Version Week 1
Day 1:
How the web page functions
Finished version of shopping cart
Day 2:
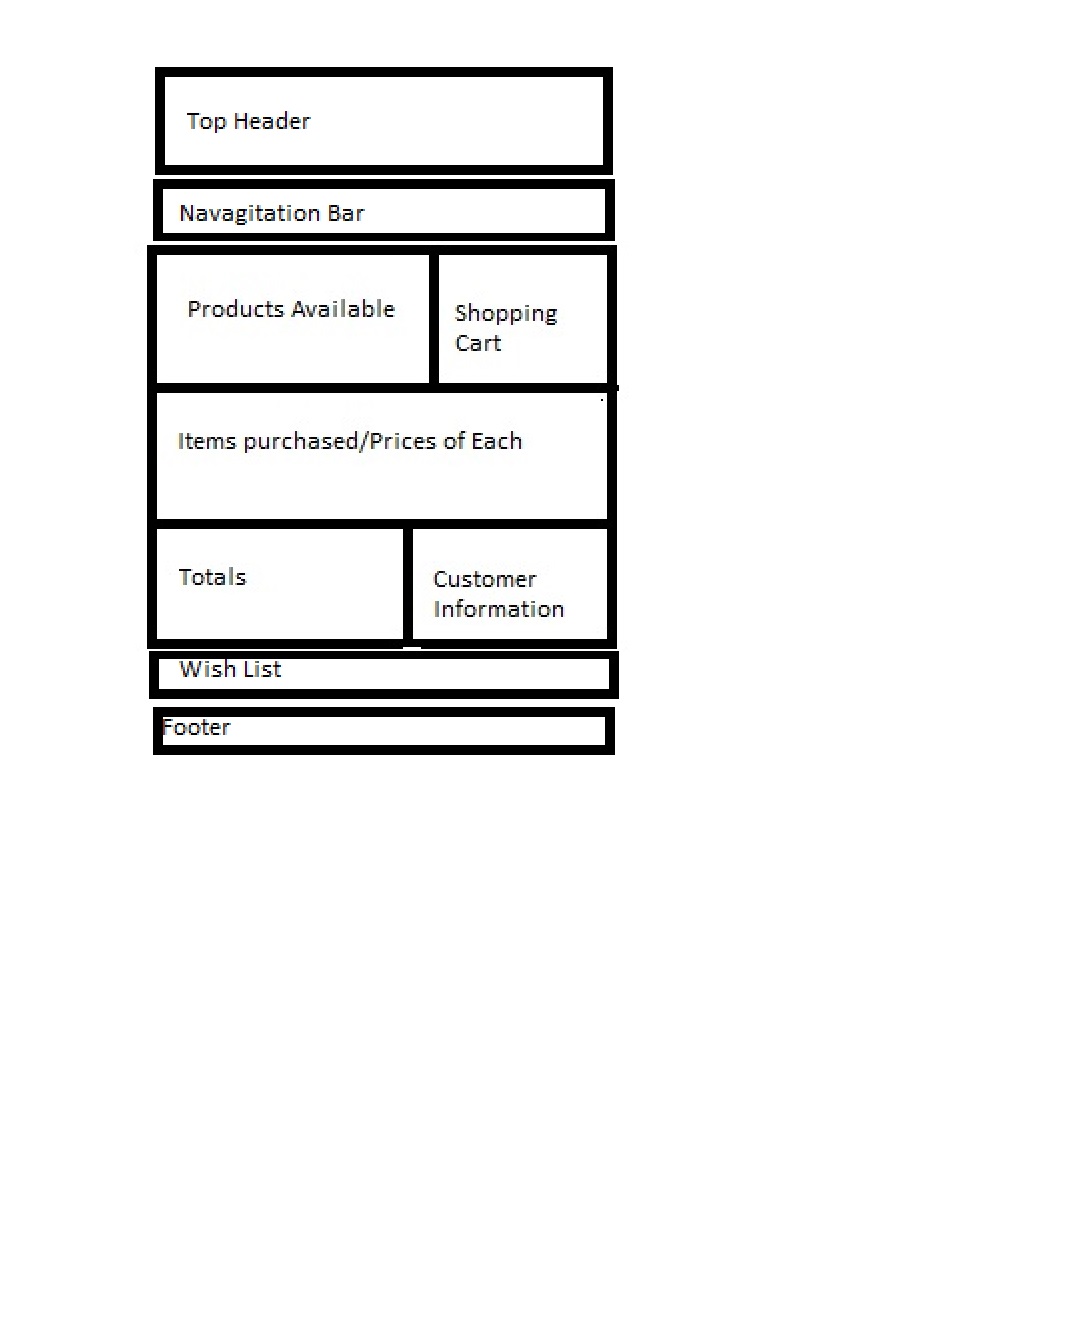
Web Page Elements - laying out the page
- We need to layout on a piece of paper how we want our shopping cart page to look like.
- For this exercise we will use the drawing seen below.
- We will be using the flexible box model for this exercise.
- The flexbox model is a system which helps us layout our web page.
- It creates a flexible layout for us in which the browser does all the calculations for us as to height, width, and placement.
- White space is distributed equally between child elements.
- The flexbox model is especially useful when working with different screen sizes like tablets and call phones.
- In the box below you can see the html file template we will be working with.
- The very top tag tells the browsers that this is an html5 file
- The second line tells the browsers to use English as the language
- The third line is the beginning head tag. Inside the head tags you will place calls to other files, search engine key words, etc
- The fourth line defines the character set to be used.
- Other character sets include Latin, Greek, Chinese, etc.
- The fifth line is where you will place the title of your document
- Inside the title tags is what shows up on the browser tabs and is useful in searching for your document by search engines.
- The next line is a comment tag. It is put here to make the browser ignore the next lie for now.
- The next line links this html document to a cascading style sheet file called parent.css.
- The next line is the ending comment tag. Which tells the browser to stop ignoring lines.
- The css file formats the layout tags like headlines, section and article tags.
- We will change these lines and remove the comment tags <!-- --> to link this html page to a cascading style sheet file and javaScript file.
- Let's start making some changes to the html file.
- First we need to get a copy of the file
- Highlight the text in the box above by dragging the whole page
- Press CTRL + C to put a copy on the clipboard.
- Open up Notepad++. Press Window Key + R. Key in Notepad++ as the program to run. Click OK.
- Select File
- Select New
- Press CTRL V to paste the document into Notepad++
- Select location for the file
- File - Save As and give the file a name.
- Make sure that you save the file type as html
Making Changes to the HTML file
- We need to supply the title of our page. We want it to be descriptive since it is a part of what search engines look for.
- The title appears on the browser's tab so we want it to be distinctive.
- Since we have a jewelery store, I selected the name The Midas Touch.
- In Greek mythology, everything King Midas touched turned to gold.
- Key in "The Midas Touch" in between the <title>The Midas Touch</title>
- Save your file then select run and launch in Chrome to see your result.
- You should see the Midas Touch located on the browser tab.
- Without a title, the browser tab prints the name of the html page.
- Without the link to the css file, here is what your screen should look like this.
Company Name
Home
About
Our Products
Contact Us
Products For Sale
Shopping Cart
Items Purchased/Prices of Items
Totals
Customer Information
(Enter the things you would like to purchase later)
Reset Note
Copyright 2014
- Before making any more changes it would be a good idea to explain some of the rest of the code on this page.
- The ending head tag, <head/> is next. This ends the area where we call different files to help format and make our page interactive.
- The beginning body tag is next and it contains an onLoad function called initialize. More on the function later,
- The beginning form tag is next. It is extremely important, since it contains the information to send the items purchased by our customers to an email address.
- The name of the form is listed first, productsForm.
- The action we want it to take when the submit button is pressed is to mail the information contained between the form tags to jerrybelch@hotmail.com
- In addition a copy is sent to another email account. I put in two different email accounts so that the information is sent to both. The first email should be your company email address, one sent to sales and the other to accounting.
- The subject is also listed in this line so that when the email is received, you can see that it is and order for merchandise.
- The method used is post.
- Change the email addresses to ones in your company
Day 3:
Layout tags
- The tag called <div id=outside_wrapper">surrounds the entire web page we are creating.
- You can't see it yet, because we have not formatted it. We will use a border color so we can see where it is.
- This is where we need a cascading style sheet file
- Listed below is a portion of parent.css file that we will be making.
Here is what the file looks like before the link to the cascading style sheet file.
Web page without formatting file linked.
Here is what the file looks like with the link to the css file.
Web page with formatting file linked.
- The lines listed above from the css file reset the margins and padding to zero
- Margins are spaces outside the border
- padding are the spaces inside the border.
- All HTML elements, like paragraphs and headings have default margins. Different browsers have different margins
- To make our web site look good on all browsers we want to reset them to zero
- Later we can specify what we want them to be.
- You will note that the code for each item is enclosed in curly braces {}
- Next list the item you want to set parameters for, like margins, background colors, padding, fonts.
- The colon, : acts like an equal sign.
- Next tell the browser what you want the setting to be.
- In the case of margins we use pixels. The abbreviations is px. We set the pixels for both margins and padding to 0px.
- The last item on the line is the semicolon, which tells us that it is the end of that particular line.
Setting the Headlines
h1{
font: bold 25px Tahoma;
}
- Tells the browser that we want headline 1 to be bold, 25 pixels and Tahoma font.
- You can see that there are formatting options for headline 2 and headline 3.
- The only difference is that each headline gets progressively smaller in terms of font size.
Day 4:
New HTML5 Elements in css file.
header,section, footer, aside, nav, article, hgroup {
display:block;
}
- These are the new HTML5 Elements for laying out your web page.
- The lines above are telling older browsers that do not recognize these elements to display them as a block of text.
Parents and Children in cs file
#parent{
border:2px solid blue;
background:pink;
display:-webkit-box;
display:-mozkit-box;
display:-ms-flex;
-webkit-box-orient:horizontal;
//-mozkit-box-orient:horizontal;
//-msflex-orient:horizontal;
-webkit-box-direction:normal;
-webkit-box-pack:center;
-webkit-box-align:center;
-webkit-box-flex:1;
}
- Children inherit traits or properties from the parent, like display:-webkit-box is a property of article 1/kid 1 and article 2/kid 2.
- To be considered a child or kid, they must be located between section or div tags.
- For example, Articles 1 and 2 are the children of parent. Article 1 will contain the pictures of our products and article two will be our shopping cart
- Article 3 is all by itself and will show what items we have dragged and dropped into the shopping cart, including the prices
- Article 4 and 5 are children of <section id="last_one"> and will contain totals and customer information.
- The wish list or note is all by itself.
- The children of parent will have a pink background and a solid blue border
Laying out the body format
body{
width: 100%;
display:-webkit-box;
-webkit-box-pack:center;
border:5px solid green;
}
- The first line of this code specifies that the element we want to format is the body.
- We can specify the width in either percentages or pixels. We specified 100%
- The display for the body element is formatted as a flexible box
- We want to put a box with a 5 pixel, solid, green border around the body of our page.
- The -webkit prefix is vendor specific. The -webkit prefix is for Chrome, and Safari.
- -moz prefix is used for Firefox.
- They are used to add features to their browsers
- The Firefox and Internet Explorer options are commented out. Some of these functions are not yet implemented in these browsers.
- The box-pack property specifies where child elements of a box are placed when the box is larger than the size of the children.
- This property specifies the horizontal position in horizontal boxes, and the vertical position in vertical boxes.
- The box-pack property can take the following properties:start means left. End means right. Center, centers the child boxes in the parent box.
Outside Wrapper
#outside_wrapper{
max-width:1000px;
margin: 20px 0px;
display:-webkit-box;
border:5px solid red;
-webkit-box-orient:vertical;
}
- The outside wrapper is a container around the entire page, but inside the body.
- These divisions will be clear to you soon when we link the style sheet to the html file
- The border of the body is green and the border for the outside wrapper is red. Click on formatted web page sample link located above.
- We want the width to be a maximum of 1000 pixels
- We want a left and right margin of 0 and a top an bottom of 20
- The margin property can be handled in a number of ways
Example 1
margin:10px 5px; - Top and bottom are 10. Right and left are 5
Example 2
margin:10px 5px 15px; -Top = 10px. Right and left=5px. Bottom is 15px;
Example 3
margin:10px; - all margins are the same 10 pixels
Example 4
margin:10px 5px 15px 20px; - Top = 10px. Right=5px. Bottom= 15px. Left=20px;
- The display:-webkit-box puts a box on your screen. This represents a section of your screen as is used to layout your web form.
- We want the boxes aligned vertically not horizontally.
Laying Out the top Header
#top_header{
//background:rgb(255,228,225);
background:#FFE4E1;
//background:mistyrose;
border:3px solid black;
padding:20px;
- The top header has a mistyrose background with a 3 pixel solid black border.
- Colors can be specified in three different ways: name of color, RGB color combination and hexadecimal.
- The example above uses hexadecimal. The other options for the same color are listed, but commented out.
- Click on sample above to find this section?
- This is where your company name and logo will go
- The padding refers to the space around any text or images in the box.
<Header id="top_header">
<H1>Company Name</H1>
</Header>
- Above are the HTML tags which are formatted by the cascading style sheet file.
Top Menu/ Nav tag plus ID
Cascading Style Sheet Code
#top_menu{
border: 3px solid orange;
//background:#8fbc8f;
//background:darkseagreen;
background:rgb(143,188,143);
}
HTML Code
<Nav id="top_menu">
<ul>
<A href="Home.html">Home</A>
<A href="About.html">About</A>
<A href="Products.html">Our Products</A>
<A href="Contact.html">Contact Us</A>
</ul>
</Nav>
- The next section want to cover is the navigation bar. This is how we get from one page to another.
- As you can see from the code above, we gave the nav tag and ID equal to top_menu. This id is then referenced in the cascading style sheet file.
- The html tag is then formatted according to the code or instructions in the cascading style sheet file.
- This section of our page has a dark sea green background. The code used RGB/ The other ways of describing the color are commented out.
- The link or menu options are in an unordered list. That means they are not numbered 1,2,3.
- When the list is complete there is an unordered ending tag, </ul>
- This section is terminated with and ending nav tag, </nav>
Day 5:
Laying out the menu in a horizontal fashion/hover code
Cascading Style Sheet Code
#top_menu li{
display:inline-block;
list-style:none;
padding:5px;
font:bold 14px tahoma;
}
a:link{color:#FF0000;} /* unvisited link red */
a:visited{color:#00ff00;} /*visited link lime*/
a:hover{color:#fffafa;} /* mouse over link snow*/
a:active{color:#0000ff;} /*selected link blue*/
- In the css code we want the menu items laid out horizontally instead of vertically
- That is what inline-block does
- We do not want a list style. These are bullets
- We want some padding between the words
- We are using a larger font to make the links to the other pages stand out.
- the a:link lines come into effect when you pass the cursor over the links. They change colors.
HTML Code for a new section
< section id = "parent">
<section id="parent">
<article id="kid1">Products For Sale
<br>
</article>
<article id="kid2">Shopping Cart
<br>
</article>
</section>
- We started this new section since it is separate from the top part of our page:The heading and navigation boxes.
- We want this box to be oriented horizontally
- You can see from the html code, that this section called parent and contains two articles.
- The first article will be used to contain pictures of all products featured in the drag and drop shopping cart.
- It is from this section where the user will click on the product and drag it to article 2: the shopping cart.
Cascading Style Sheet Code for Kid1 and Kid 2
- First we will look at kid1 and kid2. Remember they inherit some traits from the parent: the section that contains them has a pink background with a blue border.
- The kids also inherit the display property of the parent since they are inside the parent section tags.
- The display property for all children or kids is a flexbox.
- kid 1 has a solid red border with a background color of green. All margins are 10px and padding is 20px.
- Kid 1 is a flexible box. There is also a reference to coding for mozkit : Firefox browser that is commented out.
- Kid 2 also has s solid red border, but has a yellow background.
- Kid 2 is not a flexible box. You can also set a width. The code indicates a width of 220 pixels.
Cascading Style Sheet Code for Kid3 and Kid 4 and Kid 5
- Kid 3 box is used for the items purchased. It will show each item dropped into the shopping and its price.
- Kid 3 is a flexible box with a solid red 2 px border and green background. Click on the link above to see this.
- On flexible boxes, heights can be set. Non flexible boxes can contain a set width.
- Ten pixel margins are set all the way around with 20 pixels of padding.
- Kid 4 has identical properties with the exception of background color. This box will contain the totals of the order.
- Kid 5 will contain the customer information. It is a fixed box with a gray background
Day 6:
HTML Code for Wish list and Footer
Printer Friendly Version Week 2
<section id = "note" contenteditable = "true">
(Enter the things you would like to purchase later)
</br>
<a href="#" onclick="reset_note();return false">Reset Note&$60;/A>
</section>
<Footer id="the_footer">
Copyright 2014
</Footer>
</section>
- The first line sets up a section called note
- The contenteditable attribute specifies whether the content of an element is editable or not.
- The line of text telling the user the things they would like to purchase is the editable line.
- Contenteditable is a new term in HTML5.
- The onClick line will direct the browser to a javascript file allowing us to store items keyed in the note or wish list.
- Next we end the section.
- The footer is set up next
- The footer is used for things like copyright dates or other data that is pertinent to the web page.
Cascading Style Sheet Code for Note and Footer
#note{
display:-webkit-box;
-webkit-box-orient:horizontal;
background:fuchsia;
border: 5px solid silver;
}
#the_footer{
text-align: center;
padding:20px;
background:gray;
border-Top:5px solid navy;
}
- The note section is a webkit box. It is not flexible
- It has a fuchsia background with a silver border
- The footer is centered and has a top only border solid navy and a gray background.
Day 7:
Top header - logo and company name, Navigation bar
- Load your html file into Notepad++.
- Create a line under the opening header tag as follows.
<img src="midasLogo3.jpg" height=150 width=150>
<img src="midasLogo3.jpg" height=150 width=150>
<h3>Quality Jewelery at Affordable Prices</h3>
<br>
<br>
- No changes need to be made to the navigation bar, top menu or links in either file.
- In your css file add the following line to your headline 2
h2{
font: bold 12px Tahoma;
color:white;
}
- The default color for headlines is black. Our background is black, therefore our text will not show.
- White is an excellent contrast.
- After making the changes printout a copy of your css and html file listings as well as a print screen image pasted into a word processing program.
- Turn these into your instructor.
Day 8:
Completing the products available for sale box - Article 1- kid 1
- We need to download the pictures needed for this section.
- There are eight pieces of jewelery we plan to sell on this shopping cart page
- The images are numbered in order starting from zero and ending with 8
- There are also images that have descriptions and are larger than the original ones.
- We will see why that is important later
- For now we need to download these images to your hard drive
- Go to the section on Materials to Collect on this page and do the following.
- Right click each image.
- Save Image As.
- Locate directory on your hard drive where your web page is being created.
- Save as type JPEG.
- Keep file names as indicated. For example, the pink ring is images0.jpg and the one with the description is images0b.jpg.
- See table below for other file names.
| File Names used on Products.html page |
| Item Name | First Image File Name | Second Image File Name |
Pink Ring | images0.jpg | images0b.jpg |
| Jade Necklace | images1.jpg | images1b.jpg |
| Yellow Diamond Ring | images2.jpg | images2b.jpg |
| Citizens Watch | images3.jpg | images3b.jpg |
| Anniversary Band | images4.jpg | images4b.jpg |
| 3 ct Diamond ring | images5.jpg | images5b.jpg |
| 2 ct Diamond Ring | images6.jpg | images6b.jpg |
| Emerald Cut Ring | images7.jpg | images7b.jpg |
| 4 ct cocktail ring | images8.jpg | images8b.jpg |
| 10% Coupon | coupon2.jpg | - |
The heading for the products available section is complete
<Section id="parent">
<Article id="Kid1">Products For Sale
<br>
Put this information on your clipboard by dragging it putting it on the clipboard using CTRL + C and Inserting the following material between the Article 1 tags.
- In addition to the images on your page there are two JavaScript functions attached to each picture.
- draggable="true" makes the picture able to be dragged to the shopping cart
- There is also a JavaScript Function that is called once you begin to drag the object.
- The next JavaScript function that is called, occurs when you click on each image.
- The larger b image is opened in a separate window so that the user can see the picture in a larger format, see the description and the price.
- There is a separate function for each image.
- When you pass the cursor over the 10% coupon image, it enlarges and the user can see the special promotional code that can be used when placing their order.
- When you move the cursor out of the coupon image, it returns to its normal size.
- Now let's try it out, Launch in chrome your html shopping cart file.
- We need to add a height of 190 pixels to kid 2 which is our shopping cart.
- Make this change in your css file. Save it and try again. The box should look better.
- I know that I am not happy with the color scheme for kid 1 - article 1.
- In the css file change the background color for kid 1 from green to #ebc72a, which is a gold tone.
- Save and run again.
Day 9:
HTML Shopping cart - Kid 2 and Kid 3 - Items Ordered.
- We need to tell our html file where the drop zone is for the items
- Find in your html page, the line that makes reference to article id="kid2"
- Add the information about the ondrop and ondragover events to this line
- Your line should look like the one below.
- Do not forget the ending article tag.
<article id="kid2" ondrop="drop(event)" ondragover="allowDrop(event)" <center>Shopping Cart</center></article>
- Save your file.
- Later on in this tutorial we will add the code that actually makes this function work.
- A special section is needed for items ordered.
- Once the item are dropped into the shopping cart, we need to show the user which items were purchased and their costs.
- The table consists of a check box and a text box showing that a particular item was purchased
If the item has been dragged into the shopping cart its product name and price will show up in the table.
- The check box indicates that the item has been ordered.
- There is a table data cell for all 9 items available for purchase
- Copy and paste the information from the scrollable box below to your html file just under <Article id:"kid3"<.
Information for items ordered section of html page.
Day 10:
Completing the totals and Customer Information sections of the HTML file
- We now need to work on kid 4 - Total Section and kid 5 - Customer Information
- It is important that totals are updated each time an item is added to the shopping cart.
- We need to keep track of subtotals, sales tax and shipping. There is also a place to enter the promotional code to receive a 10% discount
- Take a look at the information below.
Totals Section
- Put this information on your clipboard and paste it between the beginning and ending tags for article 4
- Save your html file
Customer Information Section
- The next section that needs to be copied and pasted is the one that collects information about our customer who is placing the order.
- Paste the information right after this tag
- <article id="kid5">Customer Information
- The <fieldset> tag is used to group similar form elements and controls
- This information will be sent to the email addresses specified in the mailto form tag as well as the items ordered and their prices when the submit button is pressed.
- HTML5 has enhanced this form processing process by using labels, place holders and required field tags.
- The information is arranged in a table.
Day 11:
Printer Friendly Version Week 3
HTML5 Linking JavaSript Files/JavaScript file X1.js:Enlarging pictures and coupon
- There are numerous JavaScript functions that need to be linked to our html shopping cart page.
- It is the code in these functions that make the page functional.
- To somewhat simplify things. I have decided to have 5 separate javaScript files. All linked to the html page.
- We will examine them one at a time, but first, the lines need to be put into our html page to link the page to the files,
<script type="text/javascript" src="X1.js"></script>
<script type="text/javascript" src="X2.js></script>
<script type="text/javascript" src="X3.js"></script>
<script type="text/javascript" src="X4.js"></script>
<script type="text/javascript" src="X5.js"></script>
- Put these links on your clipboard and paste them between the beginning and ending head tags of your html document.
- We will build the JavScript files one at a time.
- First we need to create a link to the file from our html shopping cart file.
- Our first javaScript file is called X1.js. It includes the functions to enlarge the images and coupon and then put the coupon back to original size when it no longer has the focus.
- This code appears below.
- Put it on the clipboard.
- Open Notepad++.
- Make a new file.
- CTRL + V or Edit and Paste from Notepad++ to paste it into Notepad++.
- Save it as a JavaScript file type (.js) called X1.js.
- Run the program by launching it in Chrome.
- Try clicking on each product. It should open in a new window , show an enlarged image and a price and description of each item.
- Pass the mouse over the coupon
- It should show an enlarged image.
- When you move the mouse away, it should go back to normal size.
- Let us examine the code that makes this happen.
- It is in your newly created JavaScript File called X1.js.
function bigImg(x)
{
x.style.height="130px";
x.style.width="130px";
}
function normalImg(x)
{
x.style.height="54px";
x.style.width="54px";
}
- The first function bigImg(x) is called or executed, when the user passes the mouse over the image of the coupon.
<img onMouseOver="bigImg(this)"
- The image increases in size to 130 pixels by 130 pixels from its original 54 pixels by 54 pixels.
- The second function normalImg(this) returns the image to its normal size.
- onmouseout="normalImg(this)" border="3" src="coupon2.jpg" hspace="10">
- Demonstrate how this works for your instructor.
- The next nine functions relate to each product featured on our page.
- When the user clicks on the first picture, function openWin0() is called.
- When the user clicks on the second picture, function openWin(1) is called.
- Each image is opened in a blank 250 pixel by 250 pixel window, resizeable with tool bar, menu bar, and scroll bars.
- Demonstrate how this works for your instructor.
- Printout a copy of your html file and JavaScript file X1 for your instructor
- Also include a print screen of your finished work. Just put the page on the screen, size it by using the CTRL Key and the roller on the mouse. Press Print Screen key. Open Word. Paste it into work and print it out.
Day 12:
JavaScript file :drag and drop functions X2.js
- Now it is time to add the JavaScript code to make the drag and drop work.
- Put on your clipboard the code that appears below.
- Start a new file in Notepad++
- Paste this new section of code into Notepad++.
- Save your JavaScript file. Call it X2.js
What does it mean?
Information came from W3 Schools
function allowDrop(ev)
{
ev.preventDefault();
}
function drag(ev)
{
ev.dataTransfer.setData("Text",ev.target.id);
}
function drop(ev)
{
ev.preventDefault();
var data=ev.dataTransfer.getData("Text");
ev.target.appendChild(document.getElementById(data));
- We mentioned earlier that we made the images of our products draggable, by setting its draggable property to true.
- The html looks looks like. <img src="images0.jpg" id="0" height=75 width=75 border= 3 draggable="true" ondragstart="drag(event)" onClick="openWin0()"/>
- At first all the variables used need to be declared and initialized - set to zero.
- Next we need to specify what should happen when the image is dragged.
- The ondragstart attribute calls a function, drag(event), that specifies what data to be dragged.
- The dataTransfer.setData() method sets the data type and the value of the dragged data.
- In this case, the data type is "Text"and the value of the dragged data. element("drag1").
- The ondragover event specifies where the dragged data can be dropped,
- By default, data/elements cannot be dropped in other elements.
- To allow a drop, we must prevent the default handling of the element.
- This is done by calling the event.preventDefault() method for the ondragover event.
event.preventDefault()
- When the dragged data is dropped, a drop event occurs.
- In our example above, the ondrop attribute calls a function, drop(event);
Code Explained
- Call preventDefault() is to prevent the browser default handling of the data (default is open as link on drop)
- Get the dragged data with the dataTransfet.getData("Text") method. This method will return any data that was set to the same type in the setData() method.
- The dragged data is the id of the dragged element('drag1')
- Append the dragged element into the drop element.
- The data is arranged in an array. The first element in the array is 0. The next is 1, the next one is 2
- Jewel[0], Jewel[1], Jewel[2], Jewel[3], Jewel[4], Jewel[5], Jewel[6], Jewel[7], Jewel[8]
- The data number corresponds with the array number. If item 6, Jewel[6], for example, is dragged into the shopping cart , then The check box for this item is checked as well as the price check box.
- In addition, the two text boxes that go with each item, display the name and price of the item.
- The next lines set the price, determine shipping, sales tax subtotal and total for each item
- Below is the code that relates to product 6.
price6=4295.00;
shipping6=3.95;
salesTax6=price6*.07;
subTotal = subTotal + price6;
salesTax = salesTax + salesTax6;
shipping = shipping + shipping6
total = total + price6 + shipping+ salesTax;
- The next lines do the calculations and put the numbers in the total box on the html form - kid4 article 4K
document.productsForm.subTotal.value = Math.round(subTotal * 100)/100;
document.productsForm.salesTax.value = Math.round(salesTax * 100)/100;
document.productsForm.shipping.value = Math.round(shipping * 100)/100;
document.productsForm.total.value = Math.round(total *100)/100;
- There is also a rounding off math function included.
document.productsForm.subTotal.value = Math.round(subTotal * 100)/100;
- The line above refers to the html document and the form on it called productsForm and the text box called subtotal. The value of that item is placed in that box.
- There is a line for sales tax shipping and total
Day 13:
JavaScript file X3.js: code for the note or wish list.
- The next javaScript file you will create enables us to store information on the user's computer until explicitly removed by the application or user.
- To make a copy of the file. Put the code onto the clipboard. Create a new file. Paste the information and save it in the same folder as your html document. Make sure you save the file as X3.js.
- The code for file X3.js came from the textbook called HTML5 Digital Classroom by Osborn & AGI Creative Team.
Day 14:
JavaScript file X4.js: Calculate Discount
- The last JavaScript File is used to calculate the 10% discount if the user puts in the correct promotional code.
- Below is a listing of that code.
- The function is called by the following line in the HTML5 code. See code for day 10
<TD>Discount Code</td><td><input type="checkbox" name="discount"><input type="text" id="discountId" onchange = "calculateDiscount(productsForm);"></td>
- The onChange event is called when someone types text into an input field. The javaSCript function calculateDiscount(productsForm) is executed. Remember productsForm is the name of the form.
- Put the code for the calculate discount function on your clipboard. and create a new JavaScript file in Notepad++
- Make sure that you call the file X4.js, since that is the file linked to the html page.
- First the function is named calculateDiscount(productsForm)
- A left-facing curly brace outlines the beginning of what the function will do.
- The next line declare the discount to be the subtotal amount times .10
- The next line declares that the variable discountedSubTotal is equal to the subtotal minus the discount.
- A new sales tax must be computed based on the reduced price. This is the next line
- A new discounted total is calculated by taking the discounted subtotal and adding discounted sales tax and shipping.
- Now we need to get the discountId number from the html page
- Next we check to see if is the promotional code from the coupon.
- If the code is equal to 87987 a box pops up and tells the user the promotional code is valid. Click OK to apply the discount.
- Total numbers will change reflecting the 10% discount.
- If the number entered into the text box on the html page is not equal to 87987 then a box pops up telling the user that this is an incorrect code number.
Day 15:
Getting javaScript function tallyorder
Now we need to create a javaScript file to help us process the order.
- The information for the file appears below. Put it on your clipboard.
- Open a new file in Notepad++
- Paste the code into the editor.
- Save it and call it X5.js
- First all variable are declared - global
- Next comes the name of the function: tallyorder(productsForm)
- Left facing curly brace begins the code for the function
- A variable r is assigned to the confirm statement box. OK and Cancel are choices assigned to a confirm box.
- Shipping is charged for each item sent. The variable shipping equals shipping for all items in the shopping cart.
- The subTotal variable is the sum of all items in the shopping cart
- Sales tax is calculated on the subtotal. In this example it is 7%
- The total variable adds the subtotal, shipping and sales tax
- If OK is clicked the form is processed
- If Cancel is pressed, the order is not sent.
Day 16:
Testing and debugging the site: enlarging images, mouseover coupon, drag item to cart, discount, wish list, customer information, submit
Printer Friendly Version Week 4
Enlarging Images
- Open your HTML file run it and launch it in Chrome.
- Click on each item. It should open a new window with the image larger than the original.
- The picture in the new window should include a description of the item and its price.
Coupon
- Pass the mouse over the 10% coupon image. It should enlarge enough to view the special promotional code.
Drag and Drop
- Drag an item to the shopping cart.
- What happens?
- The item should appear in the shopping cart area - yellow box
- The item should disappear from the products for sale box - green
- Description, price of dragged item should appear in the white box
- In addition the check boxes for item and price should be checked.
- In the Totals box - Dark Gold box, subtotal, sales tax, shipping and total should appear
Testing Calculating Discount
- Check the box next to Discount
- Enter the promotional code 87987
- Click outside of the textbox for the discount.
- A JavaScript alert box appears saying the promotional code is valid.
- Click OK to apply the discount.
- Numbers in the totals box are adjusted showing the new discounted numbers.
- If an incorrect promotional code is entered, an alert box appears telling you that the code is invalid.
- Click OK.
- The code you entered disappears.
SUBMIT
- Now we need to test out how the form is submitted.
- Different email programs will act somewhat differently with the major browsers.
- My machine has Chrome as the browser and Window Live as the email program.
- Fill in the data for First name, Last Name, email address, address, City, state and zip code
- Click the submit button
- Form data will show up in the email and can then be sent. To, Copy and subject should reflect what was entered in the beginning form tag.
- Items should appear in the body of the email and look like the sample below. This order was for a pink sapphire ring. The first item.
- After the email has been sent, check the your email box to see if the information was sent.
- If a discount was taken, the following totals will be adjusted (subtotal, sales tax and total). The item name and the original price will remain the same.
- Use Shift + Control + J to view errors. The line number of where the error occurred is revealed
- For example, if you call a javaScript function called calculateDiscount from your html file and that function does not exist in one of your javaScript files (x1.js, x2.js, x3.js, x4.js, x5.js), or maybe it is spelled incorrectly, then you will get an error message calculateDiscount is not defined
- HTML file name.html :155
- Click on the error at the right-hand side of your screen to view the error. In our example the error is on line 155 in the html page.
- Also check your javsScript file where the function is called. In our example it is x4.js.
Day 17:
Changing the background and border colors in the cascading style sheet file.
- The colors were chosen, so we could isolate the different boxes in the flexible box model
- These colors as they are now are horrible.
- Redo the colors in your css file.
- Use a gradient in the shopping cart box - Kid 2
- Here an example of how to use a gradient in the css file. Change the background for Kid 2
- background:-webkit-linear-gradient(left,SlateGray,White);
- For Chrome use -webkit
- We want a linear gradient. One that goes in line rather than a circle - Radial.
- We want the gradient to start at the left and go to the right. Other choices could have been top right or bottom
- The beginning color for our gradient isSlateGray and the ending color is White.
- Save your file and test it. Use gradient colors that work with your page
- Print out a listing of your css file, your five javaScript files and your html file. Turn in
- Demonstrate your page for your instructor.
- Colors of backgrounds and border can easily be changed by modifying the cascading style sheet file for this project.
- The link below is devoted to colors you can use to make you html page more attractive.
- Comprehensive color chart from http://web.njit.edu/~kevin/rgb.txt.html
|